Install Qwen3-TTS on Windows with Conda
Introduction
Qwen3-TTS is an open-source series of TTS models developed by the Qwen team at Alibaba Cloud, supporting stable, expressive, and streaming speech generation, free-form voice design, and vivid voice cloning.
GitHub: https://github.com/QwenLM/Qwen3-TTS
Hugging Face: https://hf.co/collections/Qwen/qwen3-tts
Demo: https://hf.co/spaces?q=Qwen3-TTS
Prerequisites
System requirements:
- Operating System: Windows 10/11 (64-bit), macOS, or Linux (Debian/Ubuntu).
- Python: Version 3.12 required
- Disk Space: 10GB+ recommended (for dependencies and model cache). At least 400 MB for Miniconda; 3 GB+ for full Anaconda.
- The GPU is optional but HIGHLY Recommended for Performance
- Internet: For downloading dependencies and models from Hugging Face Hub.
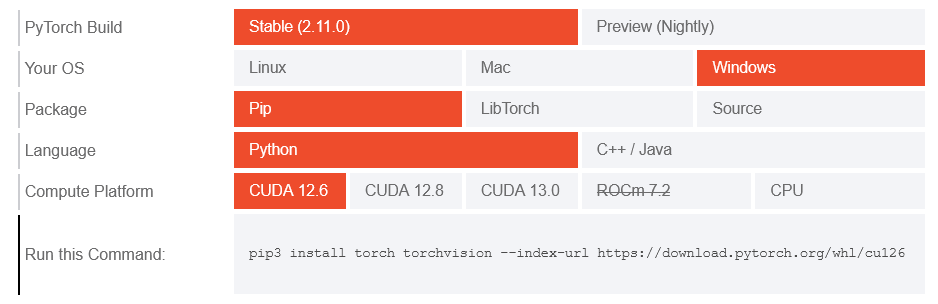
| Environment | Run this Command |
|---|---|
| CPU only | pip3 install torch torchvision |
| CUDA 11.8 | pip3 install torch torchvision torchaudio –index-url https://download.pytorch.org/whl/cu118 |
| CUDA 12.1 | pip3 install torch torchvision torchaudio –index-url https://download.pytorch.org/whl/cu121 |
| CUDA 12.6 | pip3 install torch torchvision torchaudio –index-url https://download.pytorch.org/whl/cu126 |
| CUDA 12.8 | pip3 install torch torchvision torchaudio –index-url https://download.pytorch.org/whl/cu128 |
| CUDA 13.0 | pip3 install torch torchvision torchaudio –index-url https://download.pytorch.org/whl/cu130 |
Note: CUDA version check by command
nvidia-smi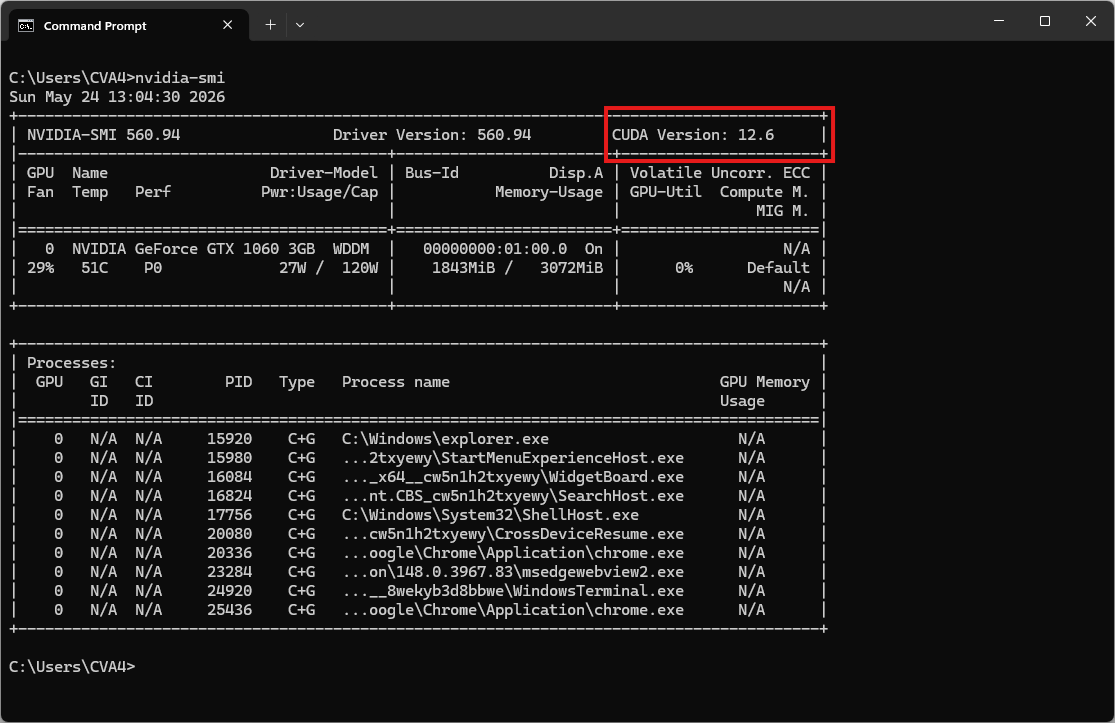
Video tutorial
Step 1. Install Miniconda Package
Download Miniconda: https://www.anaconda.com/download/success?reg=skipped
Direct link: https://anaconda.com/api/installers/Miniconda3-latest-Windows-x86_64.exe
Step 2. Create Conda Environment
Create a conda environment:
name: qwen3-tts
channels:
  - pytorch
  - nvidia
  - defaults
dependencies:
  - python=3.12
  - pip
  - pip:
      # PyTorch CUDA 12.6 wheels
      - --extra-index-url https://download.pytorch.org/whl/cu126
      - torch
      - torchvision
      - torchaudio

      # Qwen3-TTS
      - qwen-tts

      # Read/write audio files
      - soundfile

      # Download the model from Hugging Face / ModelScope
      - huggingface_hub[cli]
      - modelscope
Activate conda environment:
conda env create -f environment.yml
conda activate qwen3-tts
Step 3. Create a Python Script
Create a file named qwen3_tts_test.py:
import torch
import soundfile as sf
from qwen_tts import Qwen3TTSModel

# Use float16 instead of bfloat16 if your older GPU doesn't support bfloat16.
model = Qwen3TTSModel.from_pretrained(
    "Qwen/Qwen3-TTS-12Hz-1.7B-CustomVoice",
    device_map="cuda:0",
    dtype=torch.bfloat16,
    # Do not use attn_implementation="flash_attention_2" on Windows.
    #attn_implementation="flash_attention_2",
)

# single inference
wavs, sr = model.generate_custom_voice(
    text="Hello, this is a test.",
    language="English",
    speaker="Ryan",
)

sf.write("output.wav", wavs[0], sr)
print("output.wav has been saved!")
Run it:
python qwen3_tts_test.pyThe result will be the audio file output.wav
Audio samples
| Speaker | Voice Description | Native language |
|---|---|---|
| Vivian | Bright, slightly edgy young female voice. | Chinese |
| Serena | Warm, gentle young female voice. | Chinese |
| Uncle_Fu | Seasoned male voice with a low, mellow timbre. | Chinese |
| Dylan | Youthful Beijing male voice with a clear, natural timbre. | Chinese (Beijing Dialect) |
| Eric | Lively Chengdu male voice with a slightly husky brightness. | Chinese (Sichuan Dialect) |
| Ryan | Dynamic male voice with strong rhythmic drive. | English |
| Aiden | Sunny American male voice with a clear midrange. | English |
| Ono_Anna | Playful Japanese female voice with a light, nimble timbre. | Japanese |
| Sohee | Warm Korean female voice with rich emotion. | Korean |