Cài đặt Qwen3-TTS trên Windows bằng Conda
Giới thiệu
Qwen3-TTS là một bộ mô hình chuyển văn bản thành giọng nói (TTS) mã nguồn mở được phát triển bởi nhóm Qwen tại Alibaba Cloud, hỗ trợ tạo giọng nói ổn định, biểu cảm và liên tục, thiết kế giọng nói tự do và sao chép giọng nói sống động.
GitHub: https://github.com/QwenLM/Qwen3-TTS
Hugging Face: https://hf.co/collections/Qwen/qwen3-tts
Demo: https://hf.co/spaces?q=Qwen3-TTS
Yêu cầu hệ thống
- Hệ điều hành: Windows 10/11 (64-bit), macOS hoặc Linux (Debian/Ubuntu).
- Python: Yêu cầu phiên bản 3.12
- Dung lượng ổ cứng: Khuyến nghị 10GB trở lên (cho các thư viện phụ thuộc và bộ nhớ cache mô hình). Ít nhất 400 MB cho Miniconda; 3 GB trở lên cho Anaconda đầy đủ.
- GPU: là tùy chọn nhưng RẤT KHUYÊN DÙNG để tăng hiệu suất
- Internet: Để tải xuống các thư viện phụ thuộc và mô hình từ Hugging Face Hub.
| Environment | Run this Command |
|---|---|
| CPU only | pip3 install torch torchvision |
| CUDA 11.8 | pip3 install torch torchvision torchaudio –index-url https://download.pytorch.org/whl/cu118 |
| CUDA 12.1 | pip3 install torch torchvision torchaudio –index-url https://download.pytorch.org/whl/cu121 |
| CUDA 12.6 | pip3 install torch torchvision torchaudio –index-url https://download.pytorch.org/whl/cu126 |
| CUDA 12.8 | pip3 install torch torchvision torchaudio –index-url https://download.pytorch.org/whl/cu128 |
| CUDA 13.0 | pip3 install torch torchvision torchaudio –index-url https://download.pytorch.org/whl/cu130 |
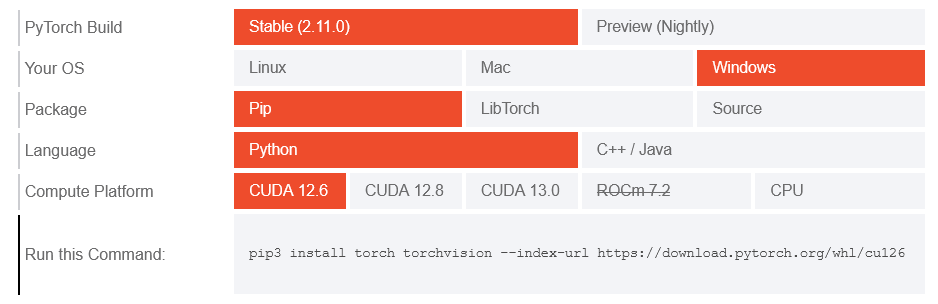
Lưu ý: Kiểm tra phiên bản CUDA bằng lệnh
nvidia-smi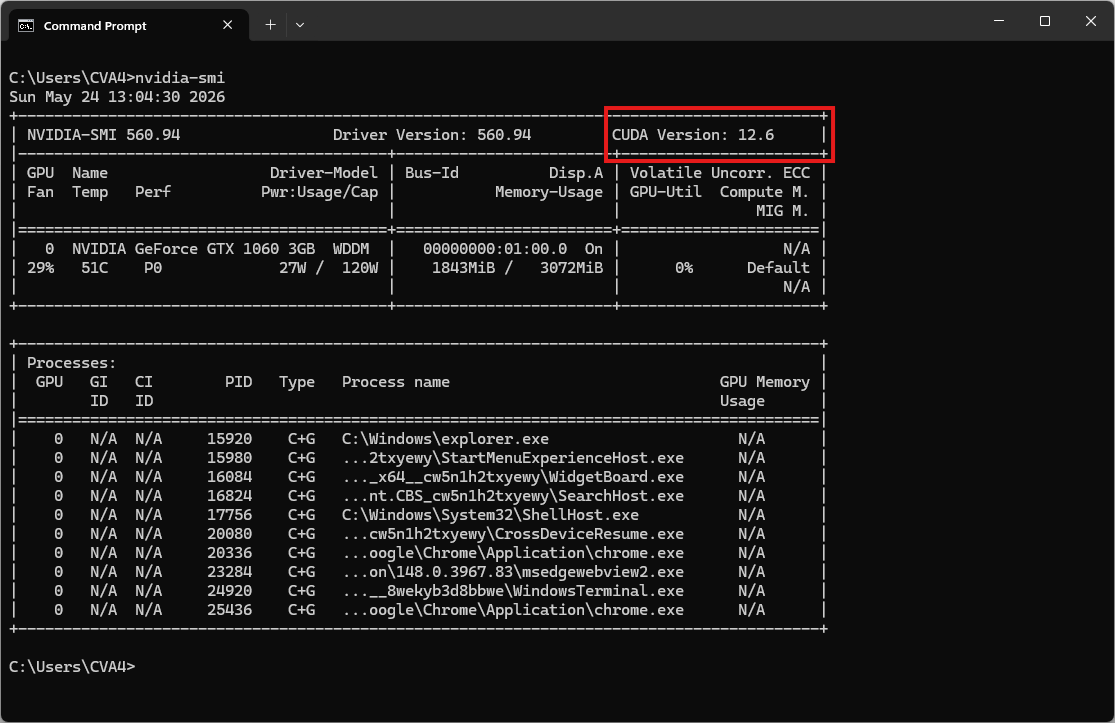
Video hướng dẫn
Bước 1. Cài đặt Miniconda
Tải xuống Miniconda: https://www.anaconda.com/download/success?reg=skipped
Liên kết trực tiếp: https://anaconda.com/api/installers/Miniconda3-latest-Windows-x86_64.exe
Bước 2. Tạo môi trường Conda
Tạo tệp environment.yml:
name: qwen3-tts
channels:
  - pytorch
  - nvidia
  - defaults
dependencies:
  - python=3.12
  - pip
  - pip:
      # PyTorch CUDA 12.6 wheels
      - --extra-index-url https://download.pytorch.org/whl/cu126
      - torch
      - torchvision
      - torchaudio

      # Qwen3-TTS
      - qwen-tts

      # Đọc/ghi file âm thanh
      - soundfile

      # Tải model từ Hugging Face / ModelScope
      - huggingface_hub[cli]
      - modelscope
Kích hoạt môi trường conda:
conda env create -f environment.yml
conda activate qwen3-tts
Bước 3. Tạo một tệp Python
Tạo một tệp có tên qwen3_tts_test.py:
import torch
import soundfile as sf
from qwen_tts import Qwen3TTSModel

# Use float16 instead of bfloat16 if your older GPU doesn't support bfloat16.
model = Qwen3TTSModel.from_pretrained(
    "Qwen/Qwen3-TTS-12Hz-1.7B-CustomVoice",
    device_map="cuda:0",
    dtype=torch.bfloat16,
    # Do not use attn_implementation="flash_attention_2" on Windows.
    #attn_implementation="flash_attention_2",
)

# single inference
wavs, sr = model.generate_custom_voice(
    text="Hello, this is a test.",
    language="English",
    speaker="Ryan",
)

sf.write("output.wav", wavs[0], sr)
print("output.wav has been saved!")
Chạy thử:
python qwen3_tts_test.pyKết quả sẽ là tệp âm thanh output.wav
Âm thanh mẫu
| Speaker | Voice Description | Native language |
|---|---|---|
| Vivian | Giọng nữ trẻ trung, sáng sủa, hơi cá tính. | Tiếng Trung |
| Serena | Giọng nữ trẻ trung, ấm áp, dịu dàng. | Tiếng Trung |
| Uncle_Fu | Giọng nam dày dặn kinh nghiệm với âm sắc trầm ấm. | Tiếng Trung |
| Dylan | Giọng nam trẻ trung đến từ Bắc Kinh với âm sắc trong trẻo, tự nhiên. | Tiếng Trung (Bắc Kinh) |
| Eric | Giọng nam sôi nổi đến từ Thành Đô với độ sáng hơi khàn. | Tiếng Trung (Tứ Xuyên) |
| Ryan | Giọng nam năng động với nhịp điệu mạnh mẽ. | Tiếng Anh |
| Aiden | Giọng nam Mỹ tươi sáng với âm vực trung rõ ràng. | Tiếng Anh |
| Ono_Anna | Giọng nữ Nhật Bản tinh nghịch với âm sắc nhẹ nhàng, linh hoạt. | Tiếng Nhật |
| Sohee | Giọng nữ Hàn Quốc ấm áp với nhiều cảm xúc. | Tiếng Hàn |