Cài đặt OmniVoice trên Windows bằng Conda
Giới thiệu
OmniVoice là một mô hình chuyển văn bản thành giọng nói (TTS) đa ngôn ngữ tiên tiến, hỗ trợ hơn 600 ngôn ngữ. Được xây dựng trên kiến trúc kiểu mô hình ngôn ngữ khuếch tán mới lạ, nó tạo ra giọng nói chất lượng cao với tốc độ suy luận vượt trội, hỗ trợ sao chép giọng nói và thiết kế giọng nói.
GitHub: https://github.com/k2-fsa/OmniVoice
Hugging Face: https://hf.co/k2-fsa/OmniVoice
Paper: https://arxiv.org/abs/2604.00688
Demo: https://hf.co/spaces/k2-fsa/OmniVoice
Audio Samples: Đang cập nhật
Yêu cầu hệ thống
- Hệ điều hành: Windows 10/11 (64-bit), macOS hoặc Linux (Debian/Ubuntu).
- Python: Yêu cầu phiên bản >= 3.10
- Dung lượng ổ cứng: Khuyến nghị 10GB trở lên (cho các thư viện phụ thuộc và bộ nhớ cache mô hình). Ít nhất 400 MB cho Miniconda; 3 GB trở lên cho Anaconda đầy đủ.
- GPU: là tùy chọn nhưng RẤT KHUYÊN DÙNG để tăng hiệu suất
- Internet: Để tải xuống các thư viện phụ thuộc và mô hình từ Hugging Face Hub.
| Environment | Run this Command |
|---|---|
| CPU only | pip3 install torch torchvision |
| CUDA 11.8 | pip3 install torch torchvision torchaudio –index-url https://download.pytorch.org/whl/cu118 |
| CUDA 12.1 | pip3 install torch torchvision torchaudio –index-url https://download.pytorch.org/whl/cu121 |
| CUDA 12.6 | pip3 install torch torchvision torchaudio –index-url https://download.pytorch.org/whl/cu126 |
| CUDA 12.8 | pip3 install torch torchvision torchaudio –index-url https://download.pytorch.org/whl/cu128 |
| CUDA 13.0 | pip3 install torch torchvision torchaudio –index-url https://download.pytorch.org/whl/cu130 |
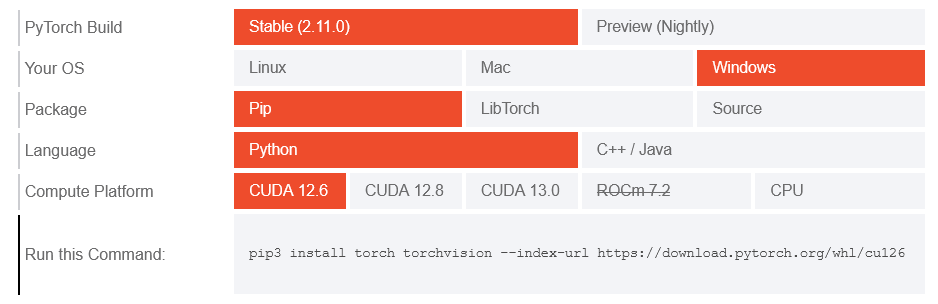
Lưu ý: Kiểm tra phiên bản CUDA bằng lệnh
nvidia-smi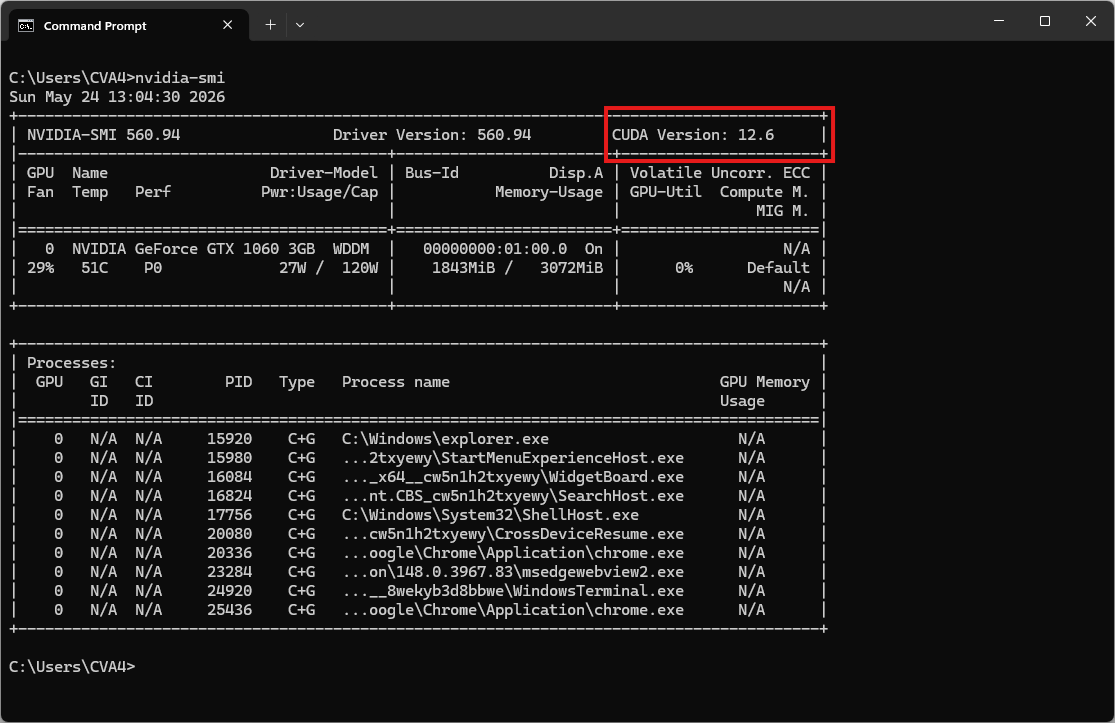
Video hướng dẫn
Bước 1. Cài đặt Miniconda
Tải xuống Miniconda: https://www.anaconda.com/download/success?reg=skipped
Liên kết trực tiếp: https://anaconda.com/api/installers/Miniconda3-latest-Windows-x86_64.exe
Bước 2. Tạo môi trường Conda
Tạo tệp environment.yml:
name: omnivoice
channels:
  - pytorch
  - conda-forge
  - defaults
dependencies:
  # Python version >= 3.10 required
  - python=3.10
  # Install FFmpeg for pydub audio library
  - ffmpeg
  - pip
  - pip:
      # PyTorch CUDA 12.6 wheels
      - --extra-index-url https://download.pytorch.org/whl/cu126
      - torch
      - torchaudio

      # OmniVoice-TTS
      - omnivoice
Kích hoạt môi trường conda:
conda env create -f environment.yml
conda activate omnivoice
Bước 3. Tạo một tệp Python
Tạo một tệp có tên omnivoice_tts_test.py:
from omnivoice import OmniVoice
import soundfile as sf
import torch

model = OmniVoice.from_pretrained(
    "k2-fsa/OmniVoice",
    device_map="cuda:0",
    dtype=torch.float16
)
# Apple Silicon users: use device_map="mps" instead
# Intel Arc GPU users: use device_map="xpu" instead

audio = model.generate(
    text="Hello, this is a test of zero-shot voice cloning.",
    # ref_audio="ref.wav",
    # ref_text="Transcription of the reference audio.",
    instruct="female, young adult, high pitch, british accent",
) # audio is a list of `np.ndarray` with shape (T,) at 24 kHz.

# If you don't want to input `ref_text` manually, you can directly omit the `ref_text`.
# The model will use Whisper ASR to auto-transcribe it.

sf.write("out.wav", audio[0], 24000)
Chạy thử:
python omnivoice_tts_test.pyKết quả sẽ là tệp âm thanh out.wav
Khởi chạy Giao diện Web (Gradio Web UI)
Sau khi cài đặt xong, bạn không cần viết code mà có thể bật ngay một giao diện Web UI cục bộ bằng lệnh:
omnivoice-demo --ip 127.0.0.1 --port 8001Mở trình duyệt và truy cập vào địa chỉ http://127.0.0.1:8001 để bắt đầu sử dụng. Hệ thống sẽ tự động tải các file Model (Trọng số cấu hình mã nguồn) từ HuggingFace trong lần đầu chạy.