Cài đặt ZipVoice trên Windows bằng Conda
Giới thiệu
ZipVoice là một loạt các mô hình chuyển văn bản thành giọng nói (TTS) nhanh và chất lượng cao dựa trên nguyên tắc khớp luồng âm thanh.
GitHub: https://github.com/k2-fsa/ZipVoice
ONNX: https://github.com/thewh1teagle/zipvoice-onnx
Hugging Face: https://hf.co/k2-fsa/ZipVoice
Demo: https://zipvoice.github.io
Paper: https://arxiv.org/abs/2506.13053
Audio Samples: https://zipvoice.github.io
Yêu cầu hệ thống
- Hệ điều hành: Windows 10/11 (64-bit), macOS hoặc Linux (Debian/Ubuntu).
- Python: Yêu cầu phiên bản >= 3.10
- Dung lượng ổ cứng: Khuyến nghị 10GB trở lên (cho các thư viện phụ thuộc và bộ nhớ cache mô hình). Ít nhất 400 MB cho Miniconda; 3 GB trở lên cho Anaconda đầy đủ.
- GPU: là tùy chọn nhưng RẤT KHUYÊN DÙNG để tăng hiệu suất
- Internet: Để tải xuống các thư viện phụ thuộc và mô hình từ Hugging Face Hub.
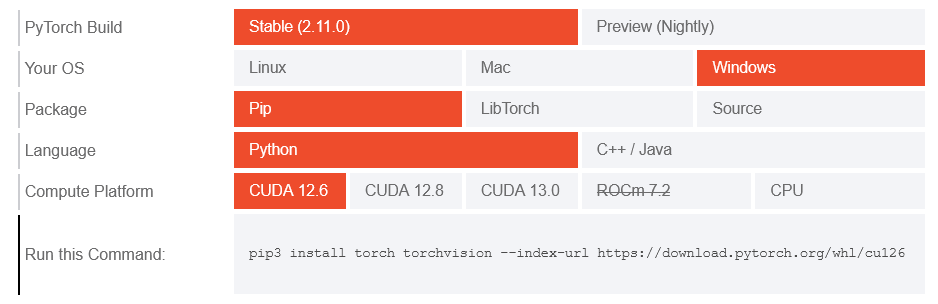
| Environment | Run this Command |
|---|---|
| CPU only | pip3 install torch torchvision |
| CUDA 11.8 | pip3 install torch torchvision torchaudio –index-url https://download.pytorch.org/whl/cu118 |
| CUDA 12.1 | pip3 install torch torchvision torchaudio –index-url https://download.pytorch.org/whl/cu121 |
| CUDA 12.6 | pip3 install torch torchvision torchaudio –index-url https://download.pytorch.org/whl/cu126 |
| CUDA 12.8 | pip3 install torch torchvision torchaudio –index-url https://download.pytorch.org/whl/cu128 |
| CUDA 13.0 | pip3 install torch torchvision torchaudio –index-url https://download.pytorch.org/whl/cu130 |
Lưu ý: Kiểm tra phiên bản CUDA bằng lệnh
nvidia-smi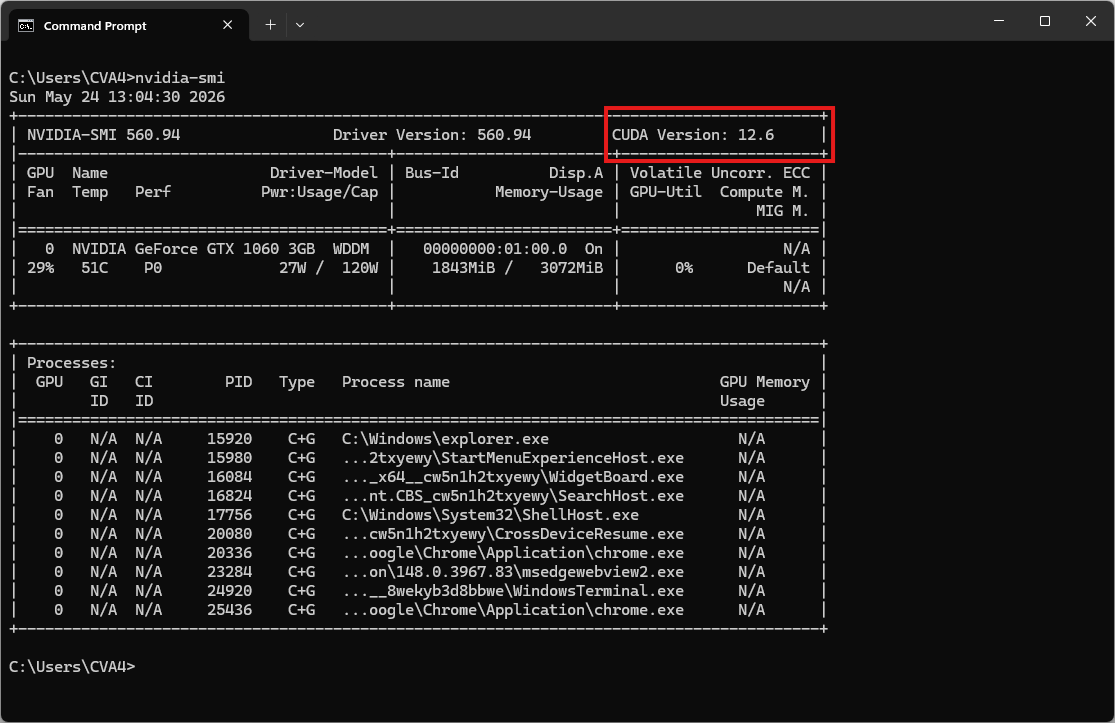
Video hướng dẫn
Bước 1. Cài đặt Miniconda
Tải xuống Miniconda: https://www.anaconda.com/download/success?reg=skipped
Liên kết trực tiếp: https://anaconda.com/api/installers/Miniconda3-latest-Windows-x86_64.exe
Bước 2. Tạo môi trường Conda
Tạo tệp environment.yml:
name: zipvoice
channels:
  - conda-forge
  - defaults
dependencies:
  # Python version
  - python=3.11

  # Install FFmpeg for torchaudio library
  - ffmpeg

  - pip
  - pip:
      # PyTorch CUDA 12.6 wheels
      - --extra-index-url https://download.pytorch.org/whl/cu126
      - torch
      - torchaudio
      - torchcodec

      # Core dependencies
      - numpy
      - lhotse
      - huggingface_hub
      - safetensors
      - urllib3
      - tensorboard
      - vocos
      - pydub

      # Normalization
      - cn2an
      - inflect

      # Tokenization
      - jieba
      - pypinyin

      # piper_phonemize wheel cho Windows — bắt buộc dùng find-links này
      - --find-links https://k2-fsa.github.io/icefall/piper_phonemize.html
      - piper_phonemize

      # Pin setuptools để tránh lỗi build với các package cũ
      - "setuptools<81"
Kích hoạt môi trường conda:
conda env create -f environment.yml
conda activate zipvoice
Clone và cài ZipVoice từ source (chạy sau khi kích hoạt môi trường)
git clone https://github.com/k2-fsa/ZipVoice.git
cd ZipVoice
Tải xuống bản ghi âm tham khảo
curl -L -O "https://github.com/thewh1teagle/zipvoice-onnx/releases/download/model-files-v1.0/prompt_english_female1.wav"Mẫu âm thanh tham khảo: prompt_english_female1.wav
Bước 3. Chạy chương trình
Chạy ZipVoice Single-speaker
python -m zipvoice.bin.infer_zipvoice --model-name zipvoice --prompt-wav prompt_english_female1.wav --prompt-text "In order to win, you must expect to win." --text "I am the text to be synthesized." --res-wav-path result.wavKết quả sẽ là tệp âm thanh result.wav
Cài đặt k2 để huấn luyện hoặc suy luận hiệu quả
k2 cần thiết cho việc huấn luyện và có thể tăng tốc quá trình suy luận. Tuy nhiên, bạn vẫn có thể sử dụng chế độ suy luận của ZipVoice mà không cần cài đặt k2.
Lưu ý: Hãy chắc chắn cài đặt phiên bản k2 phù hợp với phiên bản PyTorch và CUDA của bạn. Ví dụ, nếu bạn đang sử dụng pytorch 2.5.1 và CUDA 12.1, bạn có thể cài đặt k2 như sau:
pip install k2==1.24.4.dev20250208+cuda12.1.torch2.5.1 -f https://k2-fsa.github.io/k2/cuda.htmlVui lòng tham khảo https://k2-fsa.org/get-started/k2/ để biết thêm chi tiết.
Người dùng tại Trung Quốc đại lục có thể tham khảo https://k2-fsa.org/zh-CN/get-started/k2/.
- Để kiểm tra cài đặt k2:
python3 -c "import k2; print(k2.__file__)"