Cài đặt AuK TTS trên Windows bằng Conda
Giới thiệu
AuK là một mô hình nền tảng với 1,5 tỷ tham số, được thiết kế để tạo và chỉnh sửa giọng nói. Được huấn luyện trên hàng triệu giờ dữ liệu âm thanh đa dạng, AuK hỗ trợ các tính năng như chuyển văn bản thành giọng nói (TTS) theo cơ chế zero-shot và dựa trên chỉ dẫn, chỉnh sửa nội dung và đặc tính âm thanh, điều chỉnh các yếu tố phi ngôn ngữ (paralinguistic), cũng như tăng cường chất lượng giọng nói và tách nguồn âm thanh, tất cả thông qua một giao diện chỉ dẫn bằng ngôn ngữ tự nhiên thống nhất.
GitHub: https://github.com/Tencent-Hunyuan/AuK
Hugging Face: https://hf.co/tencent/AuK
Demo: https://hf.co/spaces/tencent/AuK
| Model | Description | Weight |
|---|---|---|
| AuK | Base model for high-quality generation | 🤗 Hugging Face · 🤖 ModelScope |
| AuK-Flash | Distilled model for fast 4-step inference | 🤗 Hugging Face · 🤖 ModelScope |
Yêu cầu hệ thống
- Hệ điều hành: Windows 10/11 (64-bit), macOS hoặc Linux (Debian/Ubuntu).
- Python: Yêu cầu phiên bản >= 3.10
- Dung lượng ổ cứng: Khuyến nghị 40GB trở lên (cho các thư viện phụ thuộc và bộ nhớ cache mô hình). Ít nhất 400 MB cho Miniconda; 3 GB trở lên cho Anaconda đầy đủ.
- GPU: là tùy chọn nhưng RẤT KHUYÊN DÙNG để tăng hiệu suất. Khuyên dùng card 12 GB (ví dụ: RTX 3060 12GB, 4070)
- Internet: Để tải xuống các thư viện phụ thuộc và mô hình từ Hugging Face Hub.
| Environment | Run this Command |
|---|---|
| CPU only | pip3 install torch torchvision |
| CUDA 11.8 | pip3 install torch torchvision torchaudio –index-url https://download.pytorch.org/whl/cu118 |
| CUDA 12.1 | pip3 install torch torchvision torchaudio –index-url https://download.pytorch.org/whl/cu121 |
| CUDA 12.6 | pip3 install torch torchvision torchaudio –index-url https://download.pytorch.org/whl/cu126 |
| CUDA 12.8 | pip3 install torch torchvision torchaudio –index-url https://download.pytorch.org/whl/cu128 |
| CUDA 13.0 | pip3 install torch torchvision torchaudio –index-url https://download.pytorch.org/whl/cu130 |
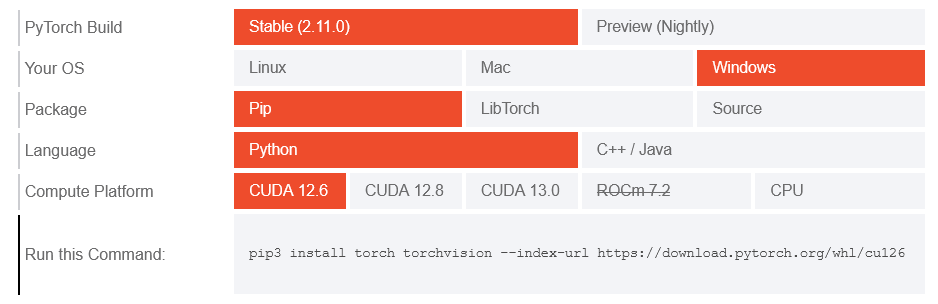
Lưu ý: Kiểm tra phiên bản CUDA bằng lệnh
nvidia-smi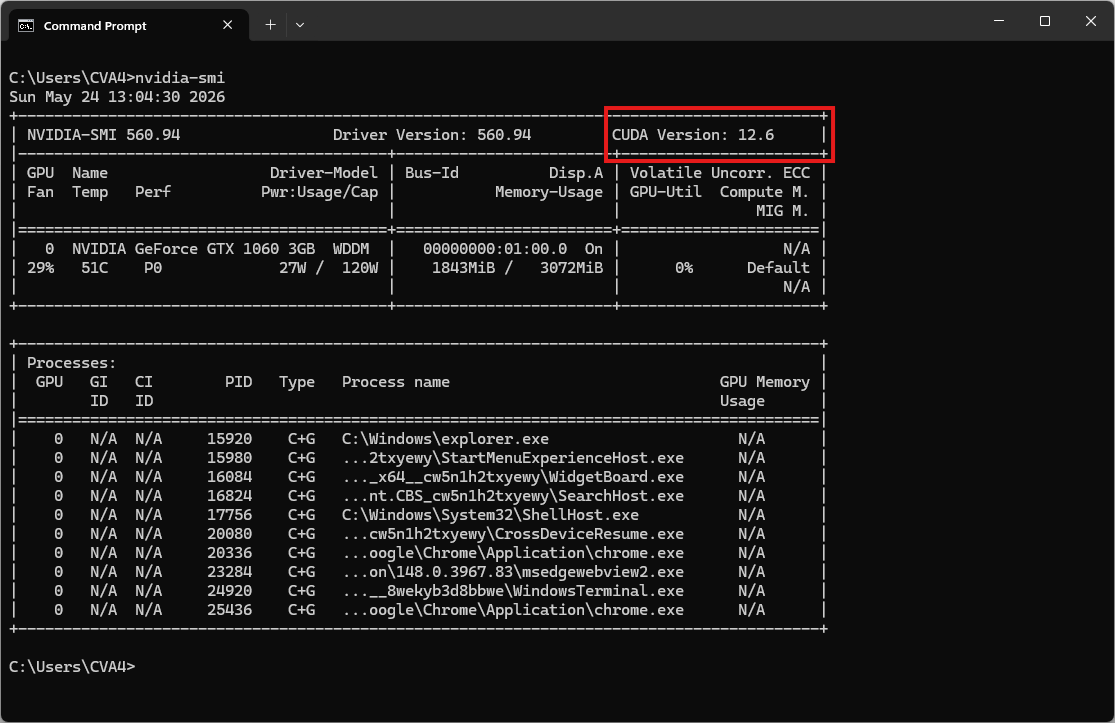
Video hướng dẫn
Sắp ra mắt!
Bước 1. Cài đặt Miniconda
Tải xuống Miniconda: https://www.anaconda.com/download/success?reg=skipped
Liên kết trực tiếp: https://anaconda.com/api/installers/Miniconda3-latest-Windows-x86_64.exe
Cài đặt Miniconda trên Windows
Bước 2. Tạo môi trường Conda
Tạo tệp environment.yml:
name: auktts
channels:
  - conda-forge
  - defaults
dependencies:
  # Python version (requires >= 3.10)
  - python=3.10

  # Handled via Conda to fix error: Microsoft Visual C++ 14.0 or greater is required
  - pynini

  - pip
  - pip:
      # This is the PyTorch CUDA 12.6 wheels. Recommendations for using the 12GB+ card
      # - --extra-index-url https://download.pytorch.org/whl/cu126
      - torch
      - torchaudio
      - torchvision

      # Install AuK directly from GitHub. Core inference and CLI only
      - git+https://github.com/Tencent-Hunyuan/AuK.git

      # Optional: Allow run Gradio/ComfyUI nodes + Prompt Enhancer + ASR (web interface)
      - gradio
      - PyYAML
      - silero-vad
      - WeTextProcessing
      - pyloudnorm
      - openai
      - tencentcloud-sdk-python-asr
      - funasr
      - modelscope

      # Optional: Fine-tuning. Recommendations for using the 24GB+ card
      - ema-pytorch
      - tensorboard
      - matplotlib
      - tqdm
Kích hoạt môi trường conda:
conda env create -f environment.yml
conda activate auktts
Clone AuK từ source (chạy sau khi kích hoạt môi trường)
git clone https://github.com/Tencent-Hunyuan/AuK
cd AuK
Tải xuống các trọng số
🤗 HuggingFace
# AuK-Base
hf download tencent/AuK --local-dir ./ckpts/AuK

# AuK-Flash (4-step distilled)
hf download tencent/AuK-Flash --local-dir ./ckpts/AuK-Flash

# MLLM Encoder
hf download Qwen/Qwen2.5-Omni-3B  --local-dir ./ckpts/Qwen2.5-Omni-3B
🤖 ModelScope
# AuK-Base
modelscope download --model Tencent-Hunyuan/AuK --local_dir ./ckpts/AuK

# AuK-Flash (4-step distilled)
modelscope download --model Tencent-Hunyuan/AuK-Flash  --local_dir ./ckpts/AuK-Flash

# MLLM Encoder
modelscope download --model Qwen/Qwen2.5-Omni-3B --local_dir ./ckpts/Qwen2.5-Omni-3B
Cấu trúc thư mục được mong đợi là:
ckpts/
├── AuK/
├── AuK-Flash/          # optional
└── Qwen2.5-Omni-3B/
Điểm lưu mô hình (checkpoint) bao gồm các trọng số của diffusion transformer và layer-fusion. Bộ mã hóa MLLM và VAE được tải từ các tệp riêng biệt trong quá trình thực thi, do đó việc thiếu các khóa text_encoder.* khi tải checkpoint là điều bình thường.
Bước 3. Chạy suy luận
Bây giờ, hãy chạy tập lệnh ví dụ cơ bản để tổng hợp giọng nói:
auk-infer --audio assets/demo-input-audio/zero-shot-tts/ref.wav --instruction "Say the following with the same voice: 'Ladies and gentlemen, it's an honor to have the opportunity to address such a distinguished audience'" --output out_tts.wav --gen_seconds 6.0Kết quả sẽ là tệp âm thanh out_tts.wav
Chạy app demo bằng Gradio
Prompt Enhancer yêu cầu một LLM tương thích với OpenAI:
- LLM: Tencent Cloud TokenHub
- Optional cloud ASR: Tencent Cloud Recording File Recognition
Hãy xuất (export) thông tin xác thực trước khi khởi động Gradio:
# Required when Prompt Enhancer is enabled
export LLM_API_KEY="your-llm-api-key"
export LLM_BASE_URL="https://tokenhub.tencentmaas.com/v1"
export LLM_MODEL_NAME="hy3"

# Optional cloud ASR; omit these to use local SenseVoiceSmall
export TENCENTCLOUD_SECRET_ID="your-tencentcloud-secret-id"
export TENCENTCLOUD_SECRET_KEY="your-tencentcloud-secret-key"
export ASR_ENGINE_MODEL_TYPE="16k_zh_en"
Với cấu trúc thư mục tiêu chuẩn, lệnh ngắn nhất sẽ phát hiện mọi biến thể đã cài đặt nằm trong ckpts/AuK và ckpts/AuK-Flash:
auk-gradioLệnh đầy đủ được đề xuất để tải cả hai mô hình lên hai GPU:
auk-gradio \
  --base_ckpt ckpts/AuK/auk_base.safetensors \
  --flash_ckpt ckpts/AuK-Flash/auk_flash.safetensors \
  --base_config ckpts/AuK/config.yaml \
  --flash_config ckpts/AuK-Flash/config.yaml \
  --qwen_path ckpts/Qwen2.5-Omni-3B \
  --base_device cuda:0 \
  --flash_device cuda:1 \
  --dtype bf16 \
  --host 0.0.0.0 \
  --port 8080 \
  --preload
Mở trình duyệt và truy cập vào địa chỉ http://127.0.0.1:7860 để bắt đầu sử dụng