Install AuK TTS on Windows with Conda
Introduction
AuK is a 1.5B foundation model for speech generation and editing. Trained on millions of hours of diverse audio data, AuK supports zero-shot and instruction-based TTS, content and acoustic editing, paralinguistic editing, speech enhancement, and source separation through a unified natural-language instruction interface.
GitHub: https://github.com/Tencent-Hunyuan/AuK
Hugging Face: https://hf.co/tencent/AuK
Demo: https://hf.co/spaces/tencent/AuK
| Model | Description | Weight |
|---|---|---|
| AuK | Base model for high-quality generation | 🤗 Hugging Face · 🤖 ModelScope |
| AuK-Flash | Distilled model for fast 4-step inference | 🤗 Hugging Face · 🤖 ModelScope |
Prerequisites
System requirements:
- Operating System: Windows 10/11 (64-bit), macOS, or Linux (Debian/Ubuntu).
- Python: version >= 3.10 required
- Disk Space: 40GB+ recommended (for dependencies and model cache). At least 400 MB for Miniconda; 3 GB+ for full Anaconda.
- The GPU is optional but HIGHLY Recommended for Performance. Recommendation a 12 GB card (e.g. RTX 3060 12GB, 4070)
- Internet: For downloading dependencies and models from Hugging Face Hub.
| Environment | Run this Command |
|---|---|
| CPU only | pip3 install torch torchvision |
| CUDA 11.8 | pip3 install torch torchvision torchaudio –index-url https://download.pytorch.org/whl/cu118 |
| CUDA 12.1 | pip3 install torch torchvision torchaudio –index-url https://download.pytorch.org/whl/cu121 |
| CUDA 12.6 | pip3 install torch torchvision torchaudio –index-url https://download.pytorch.org/whl/cu126 |
| CUDA 12.8 | pip3 install torch torchvision torchaudio –index-url https://download.pytorch.org/whl/cu128 |
| CUDA 13.0 | pip3 install torch torchvision torchaudio –index-url https://download.pytorch.org/whl/cu130 |
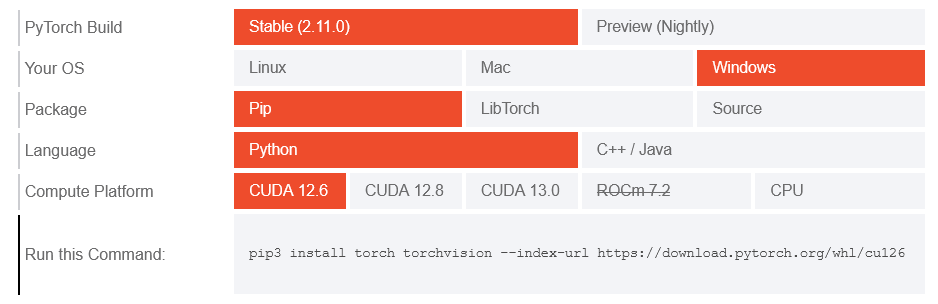
Note: CUDA version check by command
nvidia-smi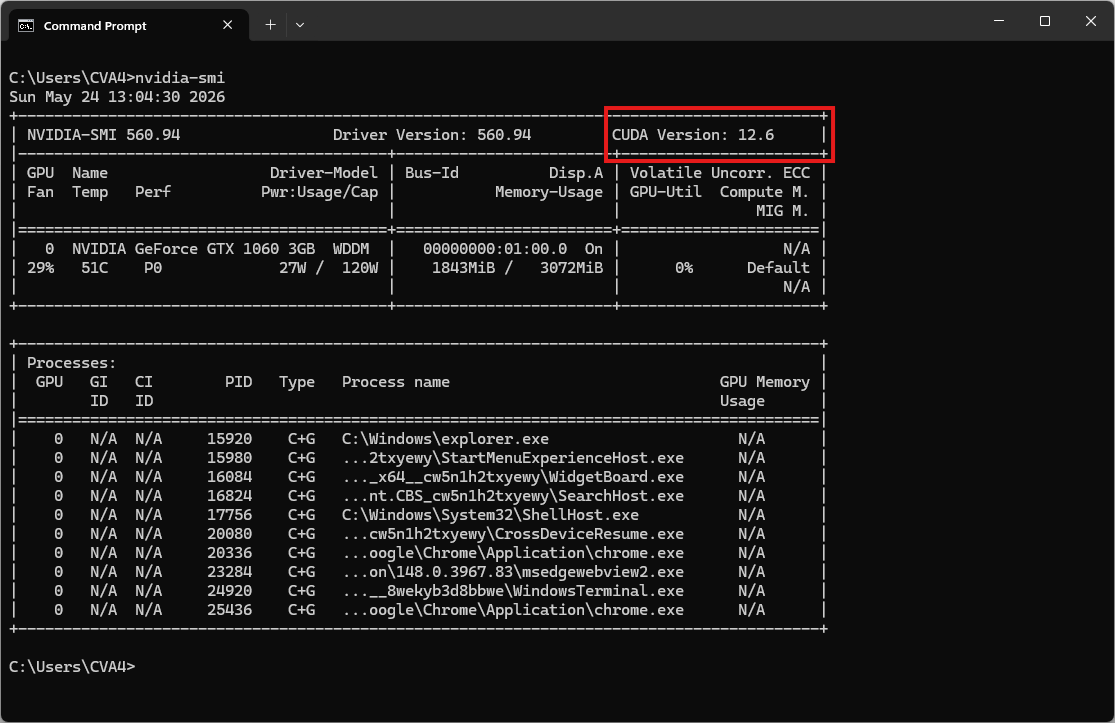
Video tutorial
Coming soon!
Step 1. Install Miniconda Package
Download Miniconda: https://www.anaconda.com/download/success?reg=skipped
Direct link: https://anaconda.com/api/installers/Miniconda3-latest-Windows-x86_64.exe
How to Install Miniconda on Windows
Step 2. Create Conda Environment
Create a conda environment:
name: auktts
channels:
  - conda-forge
  - defaults
dependencies:
  # Python version (requires >= 3.10)
  - python=3.10

  # Handled via Conda to fix error: Microsoft Visual C++ 14.0 or greater is required
  - pynini

  - pip
  - pip:
      # This is the PyTorch CUDA 12.6 wheels. Recommendations for using the 12GB+ card
      # - --extra-index-url https://download.pytorch.org/whl/cu126
      - torch
      - torchaudio
      - torchvision

      # Install AuK directly from GitHub. Core inference and CLI only
      - git+https://github.com/Tencent-Hunyuan/AuK.git

      # Optional: Allow run Gradio/ComfyUI nodes + Prompt Enhancer + ASR (web interface)
      - gradio
      - PyYAML
      - silero-vad
      - WeTextProcessing
      - pyloudnorm
      - openai
      - tencentcloud-sdk-python-asr
      - funasr
      - modelscope

      # Optional: Fine-tuning. Recommendations for using the 24GB+ card
      - ema-pytorch
      - tensorboard
      - matplotlib
      - tqdm
Activate conda environment:
conda env create -f environment.yml
conda activate auktts
Clone NeuTTS from source (run after activating the environment)
git clone https://github.com/Tencent-Hunyuan/AuK
cd AuK
Download the weights
🤗 HuggingFace
# AuK-Base
hf download tencent/AuK --local-dir ./ckpts/AuK

# AuK-Flash (4-step distilled)
hf download tencent/AuK-Flash --local-dir ./ckpts/AuK-Flash

# MLLM Encoder
hf download Qwen/Qwen2.5-Omni-3B  --local-dir ./ckpts/Qwen2.5-Omni-3B
🤖 ModelScope
# AuK-Base
modelscope download --model Tencent-Hunyuan/AuK --local_dir ./ckpts/AuK

# AuK-Flash (4-step distilled)
modelscope download --model Tencent-Hunyuan/AuK-Flash  --local_dir ./ckpts/AuK-Flash

# MLLM Encoder
modelscope download --model Qwen/Qwen2.5-Omni-3B --local_dir ./ckpts/Qwen2.5-Omni-3B
The expected directory structure is:
ckpts/
├── AuK/
├── AuK-Flash/          # optional
└── Qwen2.5-Omni-3B/
The model checkpoint contains the diffusion transformer and layer-fusion weights. The MLLM encoder and VAE are loaded from separate files at runtime, so missing text_encoder.* keys during checkpoint loading are expected.
Step 3. Run the Inference
Now, run the basic example script to synthesize speech:
auk-infer --audio assets/demo-input-audio/zero-shot-tts/ref.wav --instruction "Say the following with the same voice: 'Ladies and gentlemen, it's an honor to have the opportunity to address such a distinguished audience'" --output out_tts.wav --gen_seconds 6.0The result will be the audio file out_tts.wav
Interactive Gradio demo
Prompt Enhancer requires an OpenAI-compatible LLM:
- LLM: Tencent Cloud TokenHub
- Optional cloud ASR: Tencent Cloud Recording File Recognition
Export the credentials before starting Gradio:
# Required when Prompt Enhancer is enabled
export LLM_API_KEY="your-llm-api-key"
export LLM_BASE_URL="https://tokenhub.tencentmaas.com/v1"
export LLM_MODEL_NAME="hy3"

# Optional cloud ASR; omit these to use local SenseVoiceSmall
export TENCENTCLOUD_SECRET_ID="your-tencentcloud-secret-id"
export TENCENTCLOUD_SECRET_KEY="your-tencentcloud-secret-key"
export ASR_ENGINE_MODEL_TYPE="16k_zh_en"
With the standard directory layout, the shortest command detects every installed variant under ckpts/AuK and ckpts/AuK-Flash:
auk-gradioRecommended full command for loading both models on two GPUs:
auk-gradio \
  --base_ckpt ckpts/AuK/auk_base.safetensors \
  --flash_ckpt ckpts/AuK-Flash/auk_flash.safetensors \
  --base_config ckpts/AuK/config.yaml \
  --flash_config ckpts/AuK-Flash/config.yaml \
  --qwen_path ckpts/Qwen2.5-Omni-3B \
  --base_device cuda:0 \
  --flash_device cuda:1 \
  --dtype bf16 \
  --host 0.0.0.0 \
  --port 8080 \
  --preload
Open your browser and navigate to http://127.0.0.1:7860