Install Neu TTS on Windows with Conda
Introduction
State-of-the-art Voice AI has been locked behind web APIs for too long. NeuTTS is a collection of open source, on-device, TTS speech language models with instant voice cloning. Built off of LLM backbones, NeuTTS brings natural-sounding speech, real-time performance, built-in security and speaker cloning to your local device - unlocking a new category of embedded voice agents, assistants, toys, and compliance-safe apps.
GitHub: https://github.com/neuphonic/neutts
Hugging Face: https://hf.co/neuphonic/neutts-air
Demo: https://hf.co/neuphonic/spaces
Key Features
- 🗣Best-in-class realism for their size - produce natural, ultra-realistic voices that sound human, at the sweet spot between speed, size, and quality for real-world applications
- 📱Optimised for on-device deployment - quantisations provided in GGUF format, ready to run on phones, laptops, or even Raspberry Pis
- 👫Instant voice cloning - create your own speaker with as little as 3 seconds of audio
- 🚄Simple LM + codec architecture - making development and deployment simple
Prerequisites
System requirements:
- Operating System: Windows 10/11 (64-bit), macOS, or Linux (Debian/Ubuntu).
- Python: version >= 3.10 required
- Disk Space: 4GB+ recommended (for dependencies and model cache). At least 400 MB for Miniconda; 3 GB+ for full Anaconda.
- The GPU is optional. It runs smoothly on a laptop CPU.
- Internet: For downloading dependencies and models from Hugging Face Hub.
| Environment | Run this Command |
|---|---|
| CPU only | pip3 install torch torchvision |
| CUDA 11.8 | pip3 install torch torchvision torchaudio –index-url https://download.pytorch.org/whl/cu118 |
| CUDA 12.1 | pip3 install torch torchvision torchaudio –index-url https://download.pytorch.org/whl/cu121 |
| CUDA 12.6 | pip3 install torch torchvision torchaudio –index-url https://download.pytorch.org/whl/cu126 |
| CUDA 12.8 | pip3 install torch torchvision torchaudio –index-url https://download.pytorch.org/whl/cu128 |
| CUDA 13.0 | pip3 install torch torchvision torchaudio –index-url https://download.pytorch.org/whl/cu130 |
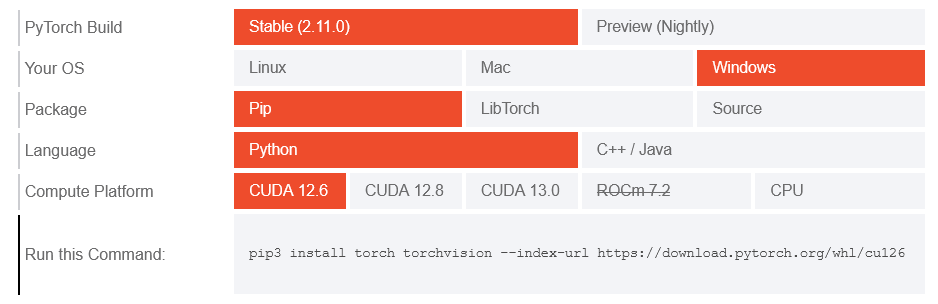
Note: CUDA version check by command
nvidia-smi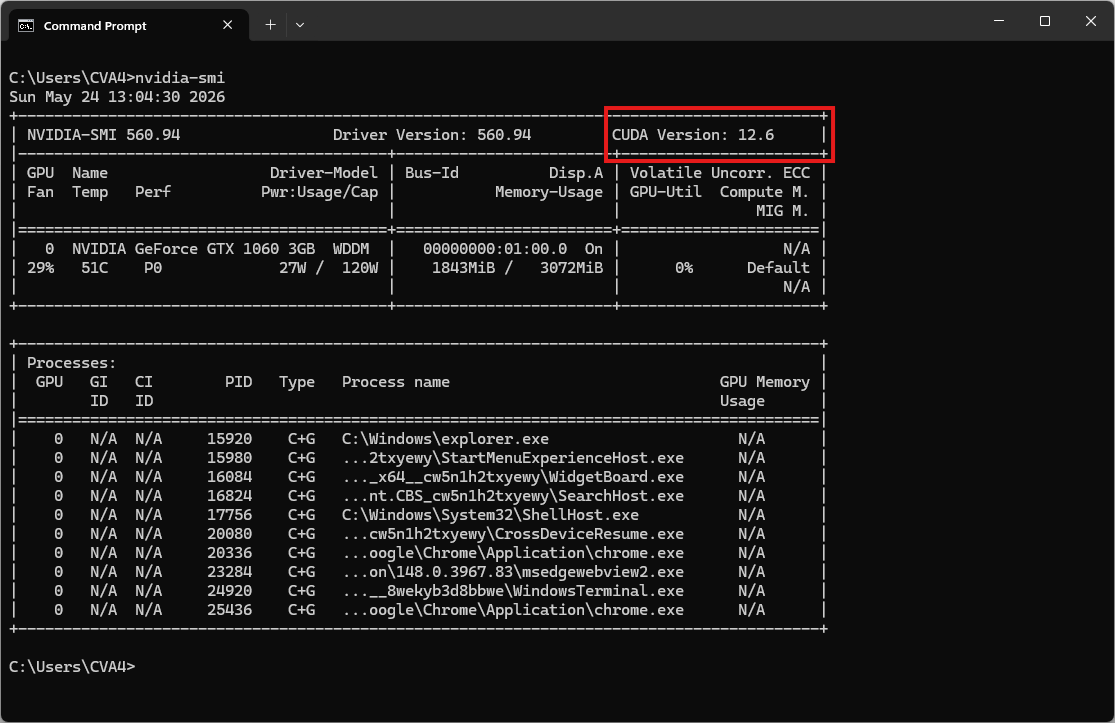
Video tutorial
Step 1. Install Miniconda Package
Download Miniconda: https://www.anaconda.com/download/success?reg=skipped
Direct link: https://anaconda.com/api/installers/Miniconda3-latest-Windows-x86_64.exe
How to Install Miniconda on Windows
Step 2. Create Conda Environment
Create a conda environment:
name: neutts
channels:
  - conda-forge
  - defaults
dependencies:
  # Python version (requires >= 3.10)
  - python=3.10
  - pyaudio            # for streaming playback examples

  - pip
  - pip:
      # PyTorch CUDA is optional. It runs smoothly on a laptop CPU.
      # - --extra-index-url https://download.pytorch.org/whl/cu126
      - torch
      - torchaudio

      # For fix ModuleNotFoundError: No module named 'torchao.dtypes.nf4tensor'
      - torchao==0.13.0

      # Install NeuTTS
      - neutts

      # Download the model from Hugging Face
      - huggingface_hub
Activate conda environment:
conda env create -f environment.yml
conda activate neutts
Clone NeuTTS from source (run after activating the environment)
git clone https://github.com/neuphonic/neutts.git
cd neutts
The reference audio https://github.com/neuphonic/neutts/tree/main/samples
Step 3. Access to model
Request Access on the Hugging Face Website. Because this model has restricted access, you must manually accept its terms first:
- Log in to your Hugging Face account in your browser.
- Go directly to the model page of NeuTTS Nano and NeuCodec:
- Fill out any required information and click the
Agree and access repositorybutton. - Generate a token with
Readpermissions by going to your Hugging Face Settings > Access Tokens. - Open your terminal and run:
hf auth loginThe CLI will prompt you in one of two ways:- Login with your browser
- Paste an Access Token
- Select the first option. The CLI will display a short code and ask you to open a URL (https://huggingface.co/oauth/device). Paste the code into your browser window to instantly approve the login.
- Select the second option. Paste your token when prompted and hit Enter.
Note: Your request to access this repository has been submitted and is awaiting a review from the repository authors. You can check the status of all your access requests in your settings.
Step 4. Run the Inference
Now, run the basic example script to synthesize speech:
python -m examples.basic_example --input_text "My name is Sophie. I'm 25 and I just moved to London." --ref_audio samples/sophie.wav --ref_text samples/sophie.txtThe result will be the audio file output.wav
One-Code Block Usage
from neutts import NeuTTS
import soundfile as sf

tts = NeuTTS(
   backbone_repo="neuphonic/neutts-nano", # or 'neuphonic/neutts-nano-q4-gguf' with llama-cpp-python installed
   backbone_device="cpu",
   codec_repo="neuphonic/neucodec",
   codec_device="cpu"
)
input_text = "My name is Andy. I'm 25 and I just moved to London. The underground is pretty confusing, but it gets me around in no time at all."

ref_text = "samples/jo.txt"
ref_audio_path = "samples/jo.wav"

ref_text = open(ref_text, "r").read().strip()
ref_codes = tts.encode_reference(ref_audio_path)

wav = tts.infer(input_text, ref_codes, ref_text)
sf.write("test.wav", wav, 24000)