Install dots.tts with Conda
Introduction
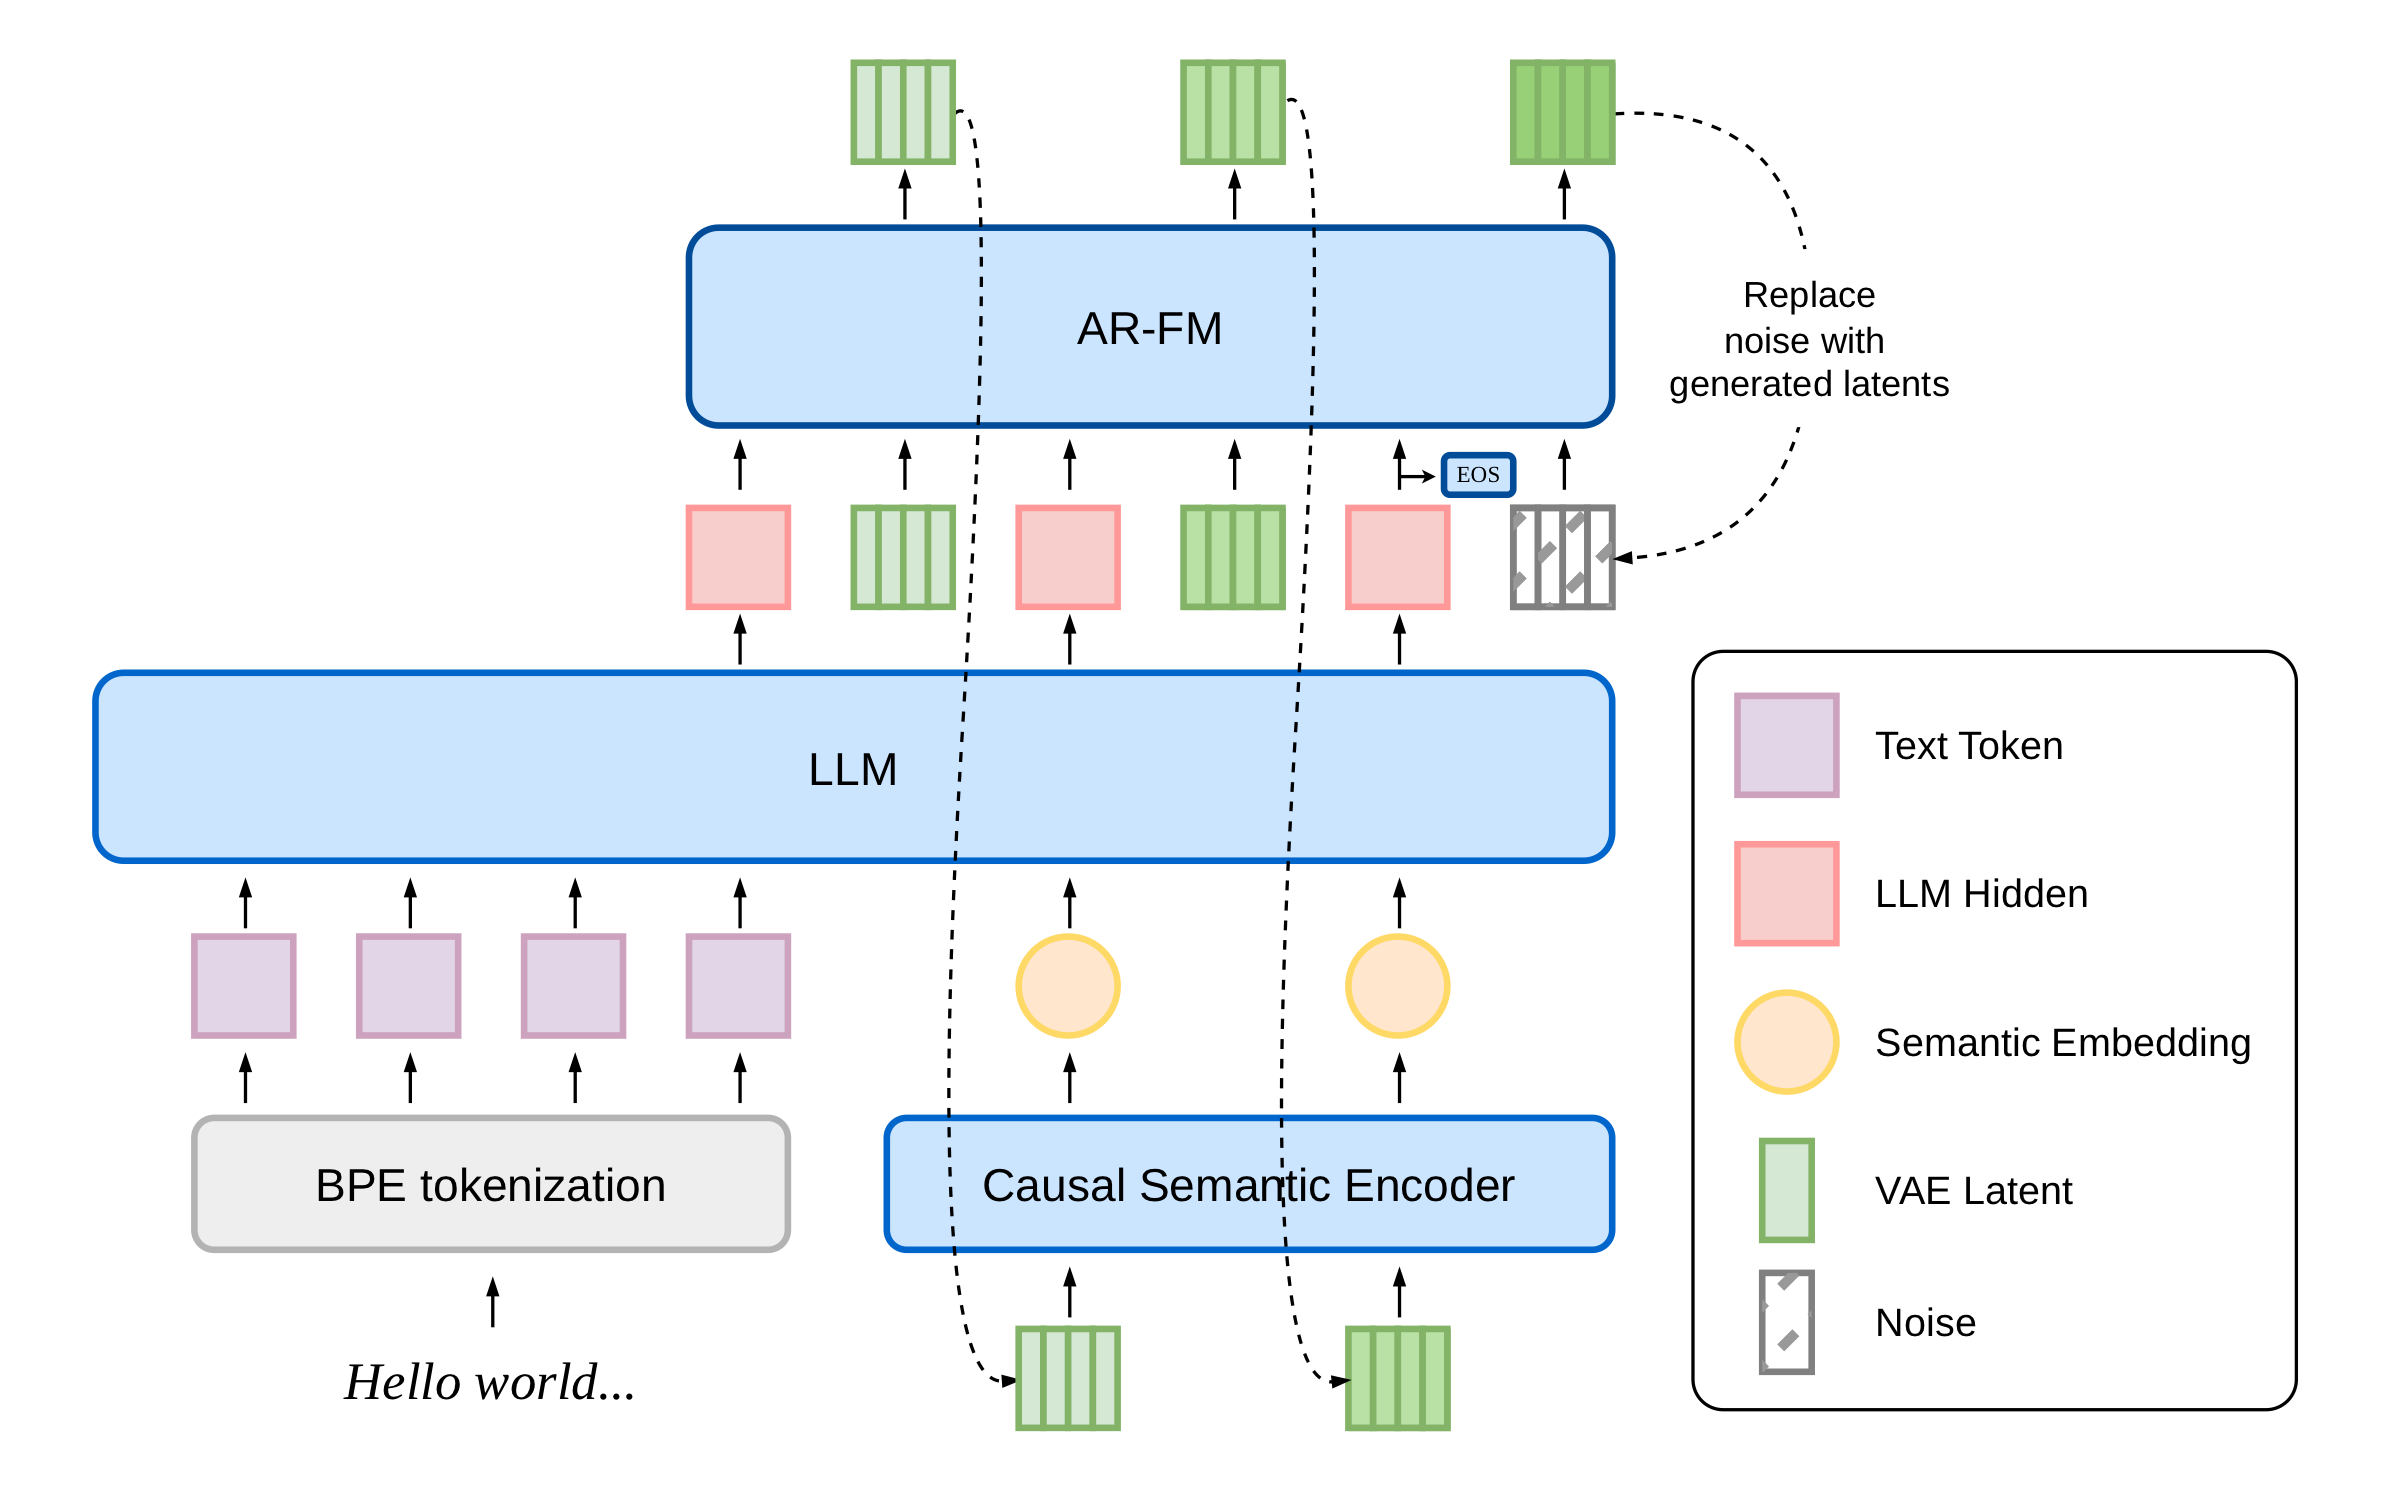
dots.tts is a 2B-parameter fully continuous, end-to-end autoregressive (AR) text-to-speech system. The backbone pairs a semantic encoder, an LLM, and an autoregressive flow-matching acoustic head over a 48 kHz AudioVAE, with no discrete tokens anywhere in the pipeline.
GitHub: https://github.com/studio-dots-ai/dots.tts
Hugging Face: https://hf.co/collections/dots-studio/dotstts
Playground: https://hf.co/spaces/dots-studio/dots.tts
Demo Page: https://studio-dots-ai.github.io/dots.tts-demo/
Report: https://arxiv.org/abs/2606.07080
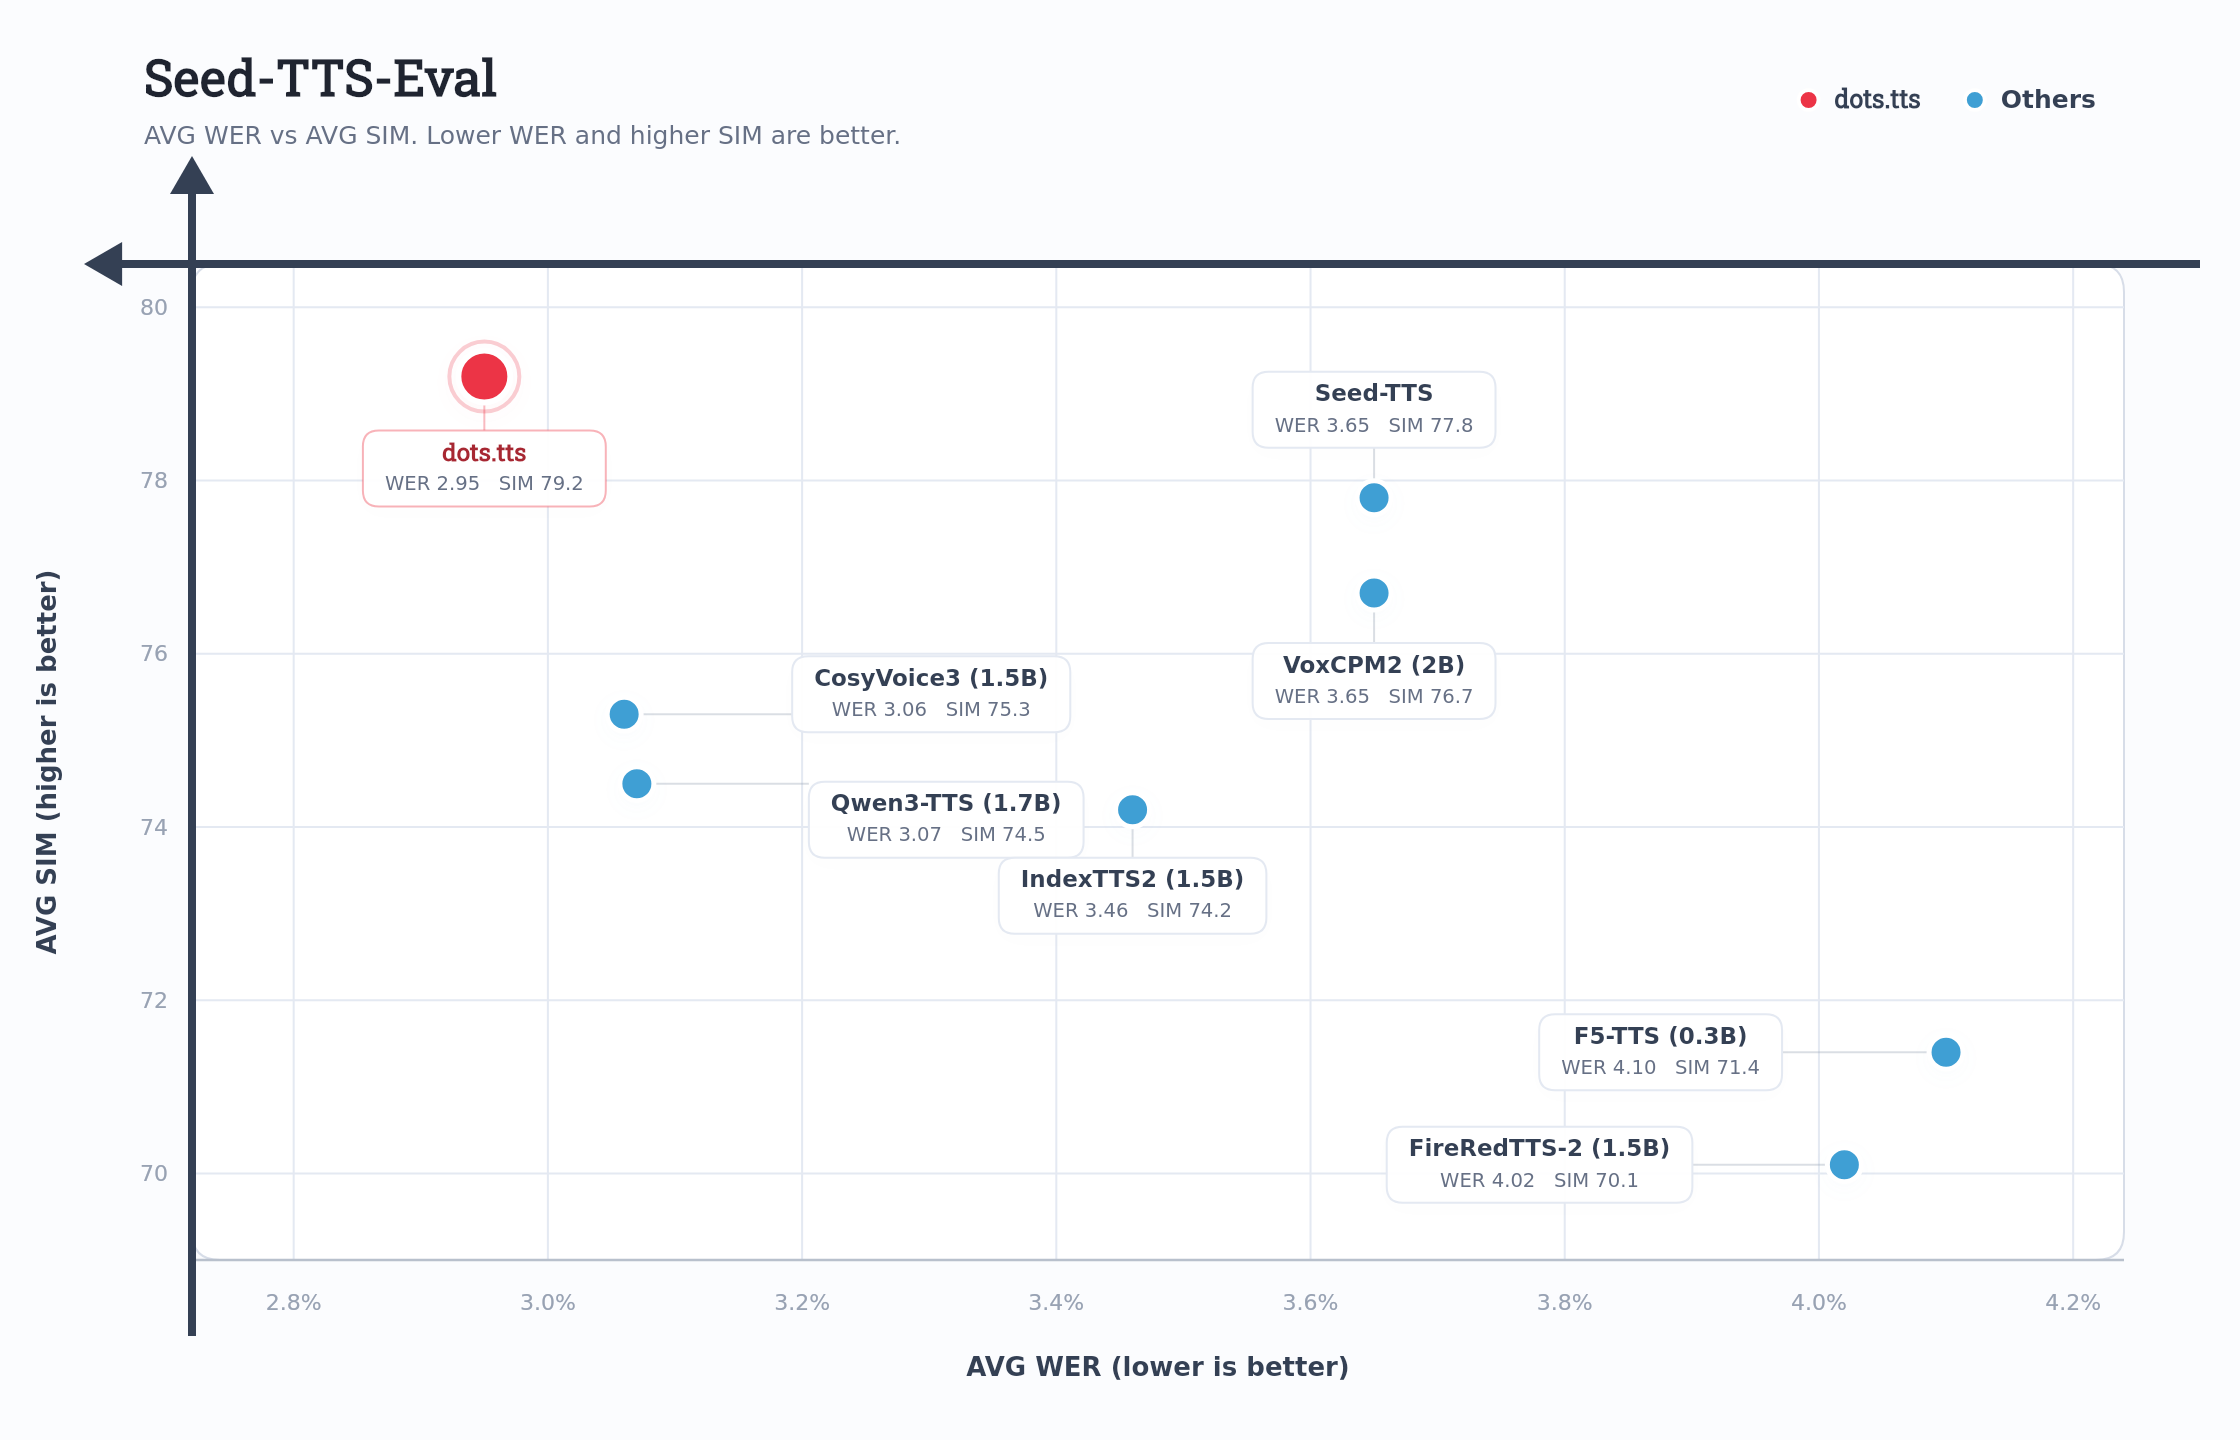
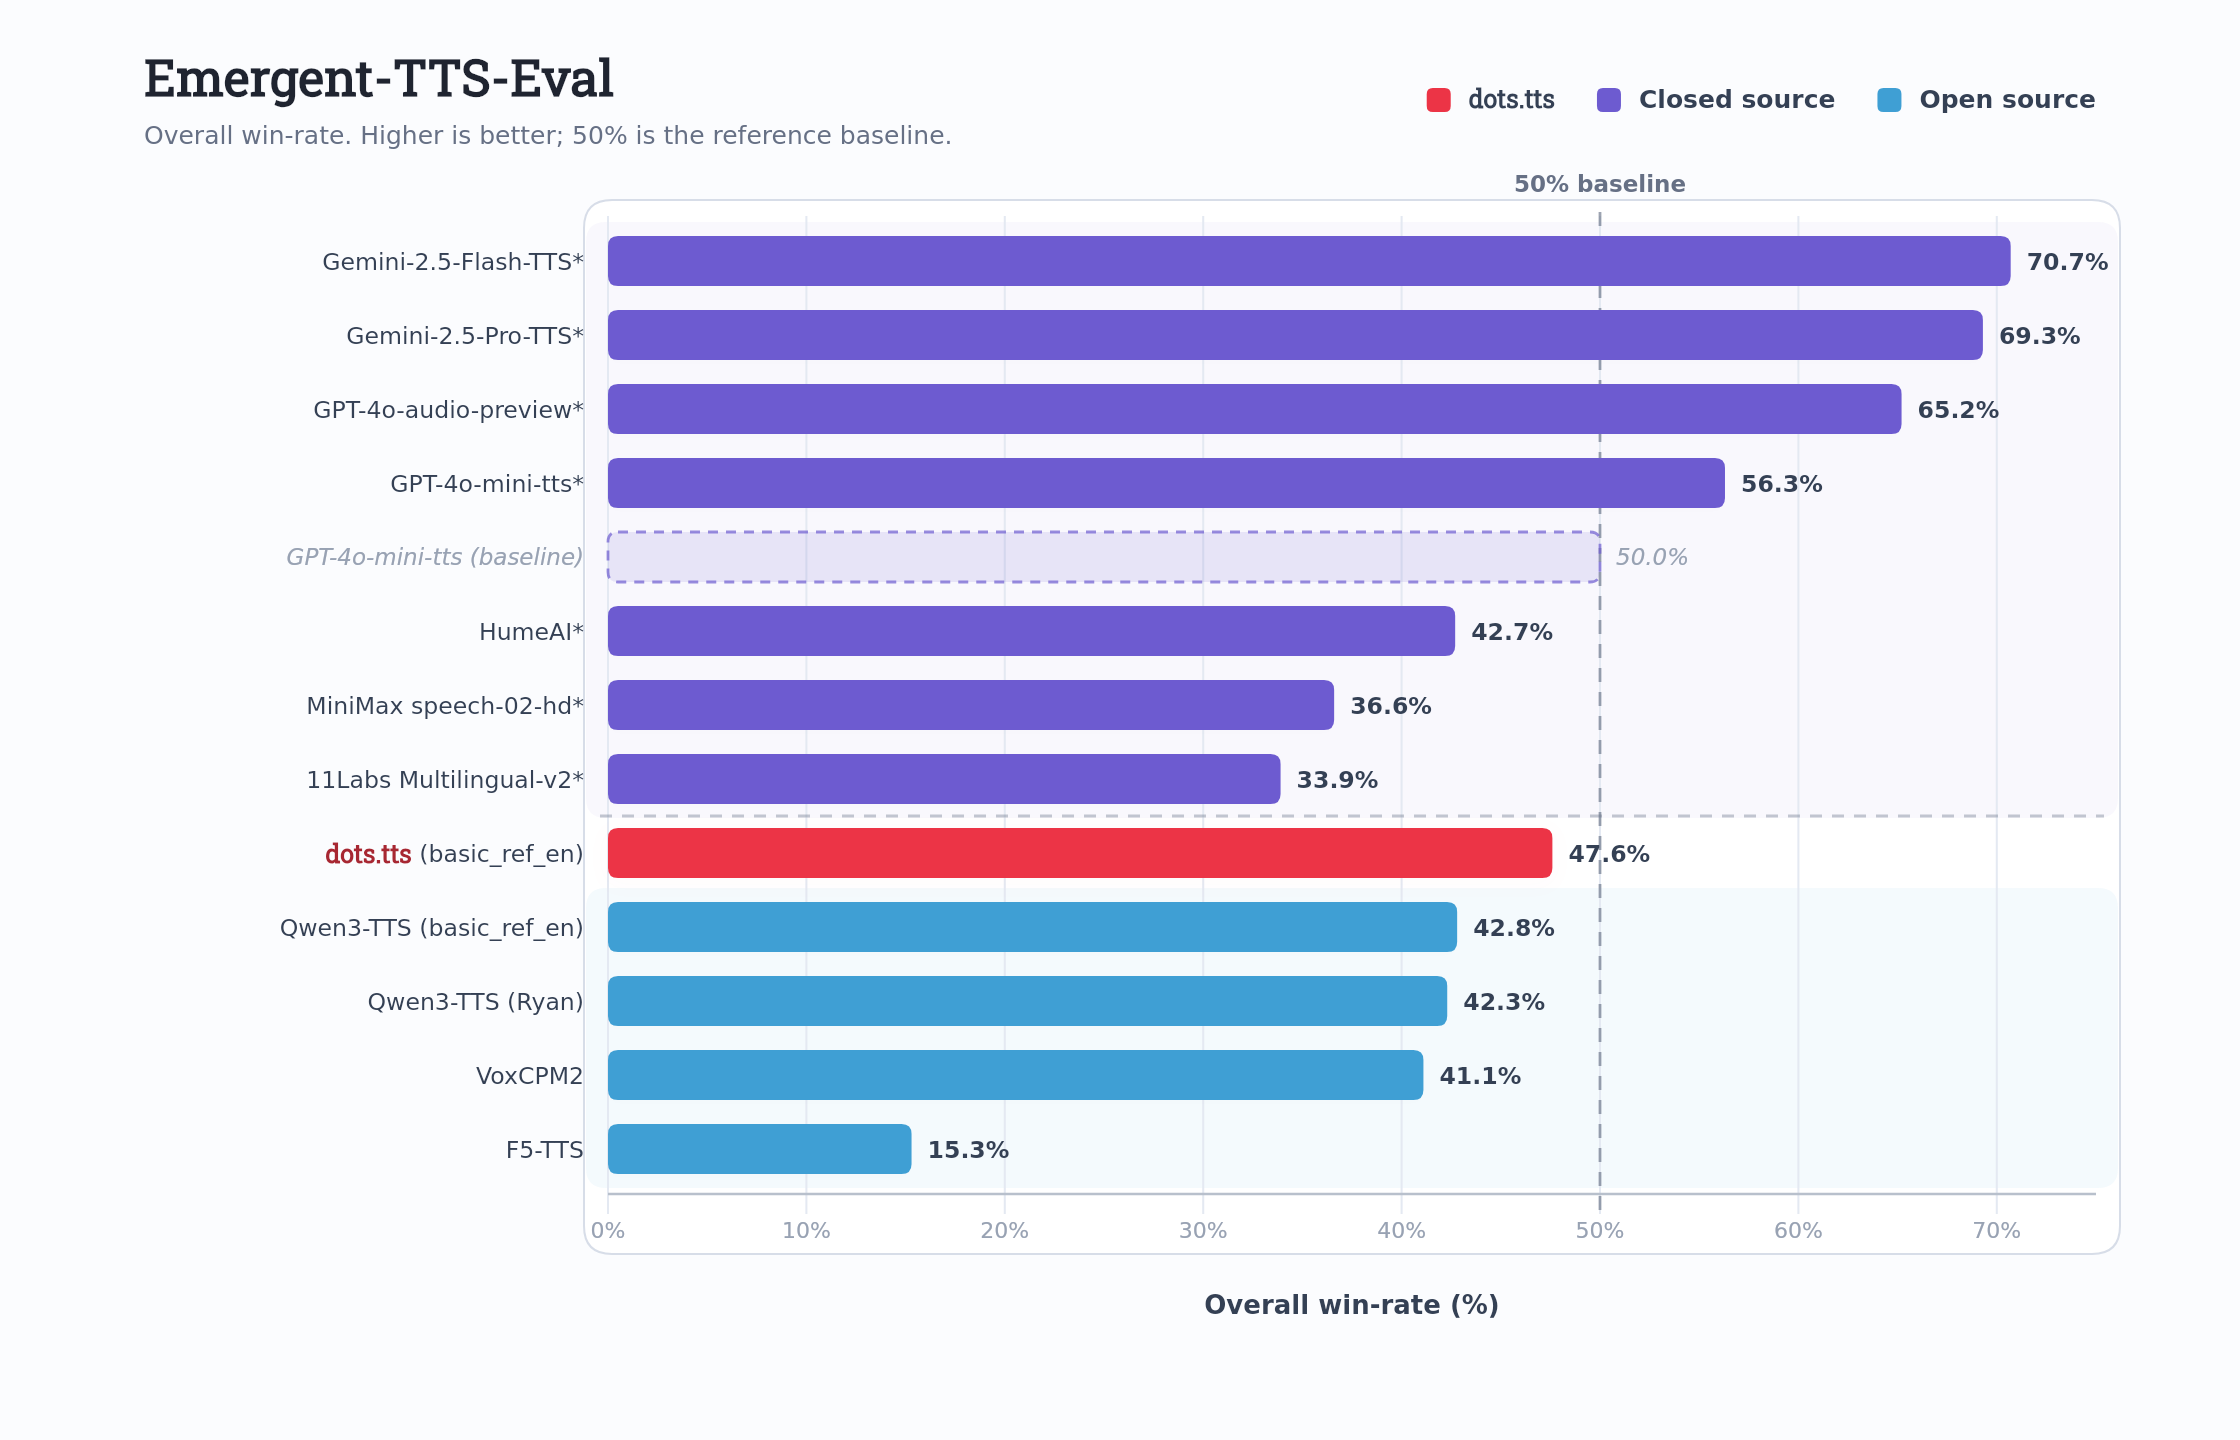
dots.tts achieves the best average performance on Seed-TTS-Eval, with WERs of 0.94% / 1.30% / 6.60% and SIM scores of 81.0 / 77.1 / 79.5 on the zh / en / zh-hard test sets, respectively. It further attains the highest average speaker similarity (83.9) on the 24-language MiniMax multilingual benchmark. Across other benchmarks, dots.tts also consistently demonstrates open-source state-of-the-art performance, exhibiting strong generation stability, voice cloning ability, and emotional expressiveness.
Prerequisites
System requirements:
- Operating System: Windows 10/11 (64-bit), macOS, or Linux (Debian/Ubuntu).
- Python: version >= 3.10 required
- Disk Space: 10GB+ recommended (for dependencies and model cache). At least 400 MB for Miniconda; 3 GB+ for full Anaconda.
- The GPU is optional but HIGHLY Recommended for Performance.
- Internet: For downloading dependencies and models from Hugging Face Hub.
| Requirements | CPU | RAM |
|---|---|---|
| Minimum | Intel Core i3 or AMD Ryzen 3 | 8 GB |
| Recommended | Intel Core i5 or AMD Ryzen 5 | 16 GB |
| High-performance | Intel Core i7/i9 or AMD Ryzen 7/9 | 32 GB |
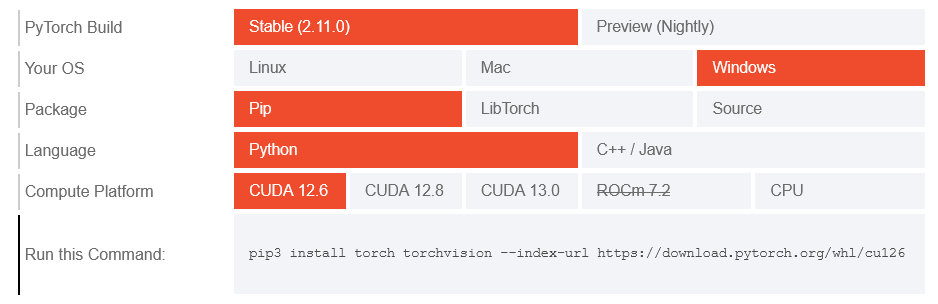
| Environment | Run this Command |
|---|---|
| CPU only | pip3 install torch torchvision |
| Apple Silicon | pip3 install torch torchvision |
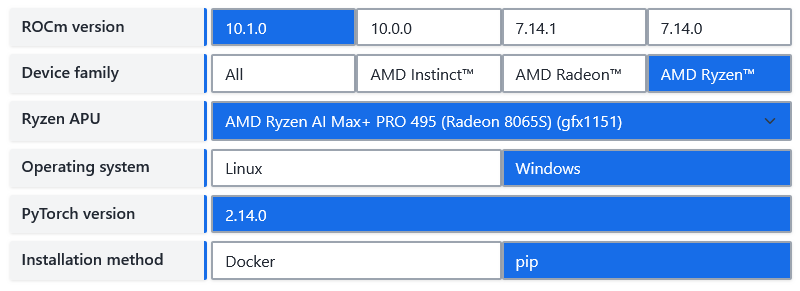
| AMD ROCm | Install PyTorch for ROCm |
| CUDA 11.8 | pip3 install torch torchvision torchaudio --index-url https://download.pytorch.org/whl/cu118 |
| CUDA 12.1 | pip3 install torch torchvision torchaudio --index-url https://download.pytorch.org/whl/cu121 |
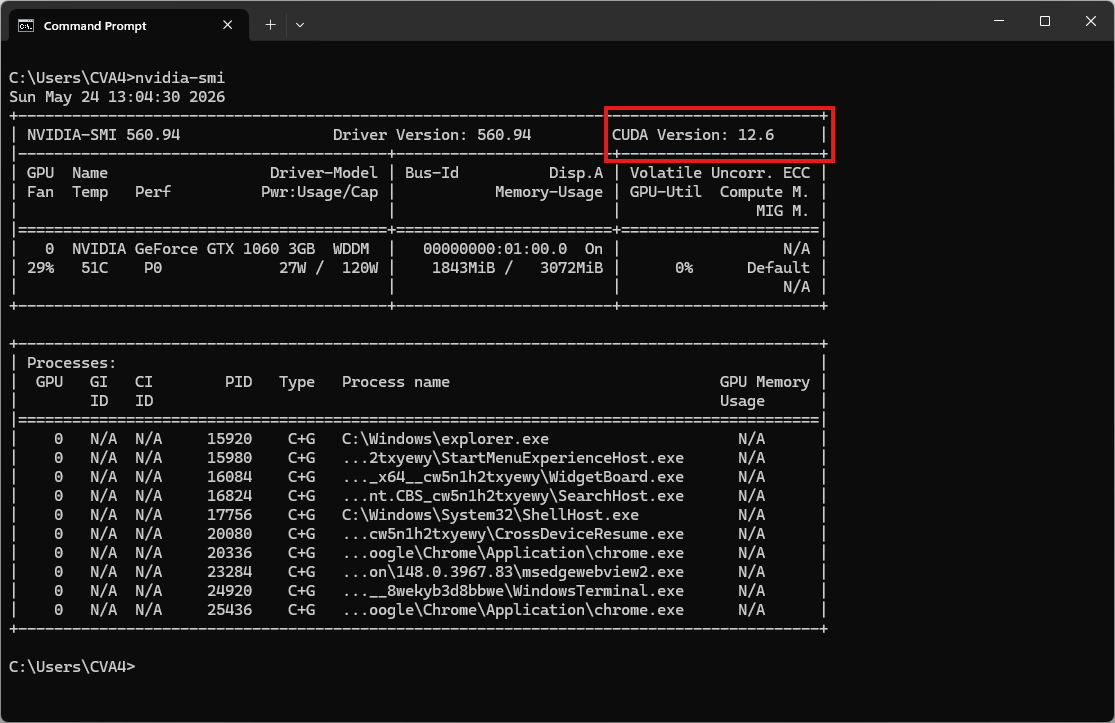
| CUDA 12.6 | pip3 install torch torchvision torchaudio --index-url https://download.pytorch.org/whl/cu126 |
| CUDA 12.8 | pip3 install torch torchvision torchaudio --index-url https://download.pytorch.org/whl/cu128 |
| CUDA 13.0 | pip3 install torch torchvision torchaudio --index-url https://download.pytorch.org/whl/cu130 |
Video tutorial
Coming soon!
Step 1. Install Miniconda Package
Download Miniconda: https://www.anaconda.com/download/success?reg=skipped
Direct link: https://anaconda.com/api/installers/Miniconda3-latest-Windows-x86_64.exe
Direct link: https://repo.anaconda.com/miniconda/Miniconda3-latest-Windows-arm64.exe
How to Install Miniconda on Windows
Step 2. Create Conda Environment
Create an environment.yml file
name: dots_tts
channels:
- conda-forge
- defaults

dependencies:
# Python version (requires >=3.10,<3.13)
- python=3.10
- pip

# Handled via Conda to guarantee OpenFST binary mapping
- pynini

- pip:
    # PyTorch CPU only
    - torch==2.8.0
    - torchaudio==2.8.0

    # Install dots.tts directly from PyPI
- dots.ttsActivate conda environment:
conda env create -f environment.yml
conda activate dots_tts
Step 3. Run the Inference
Command Line Interface
# sanity check
dots.tts --help
usage: dots.tts [-h] --model-name-or-path MODEL_NAME_OR_PATH [--revision REVISION] [--cache-dir CACHE_DIR] --text TEXT [--output OUTPUT] [--precision PRECISION] [--seed SEED] [--prompt-audio PROMPT_AUDIO]
[--prompt-text PROMPT_TEXT] [--language LANGUAGE] [--template-name {tts,instruction_tts,text_to_audio,tts_interleave}] [--ode-method ODE_METHOD] [--num-steps NUM_STEPS]
[--guidance-scale GUIDANCE_SCALE] [--speaker-scale SPEAKER_SCALE] [--max-generate-length MAX_GENERATE_LENGTH] [--max-sequence-length MAX_SEQUENCE_LENGTH] [--normalize-text]
[--profile-inference] [--profile-inference-calls]
dots.tts inference CLI.
options:
-h, --help show this help message and exit
--model-name-or-path MODEL_NAME_OR_PATH
Local pretrained directory or Hugging Face repo id
--revision REVISION Optional Hugging Face revision
--cache-dir CACHE_DIR
Optional Hugging Face cache dir
--text TEXT Input text
--output OUTPUT Output wav file path
--precision PRECISION
Inference precision
--seed SEED Random seed for inference.
--prompt-audio PROMPT_AUDIO
Path to prompt audio
--prompt-text PROMPT_TEXT
Transcript of prompt audio
--language LANGUAGE Language tag mode. Default: none. Supported values: none, auto_detect, or a language code/name such as EN/en/english/chinese.
--template-name {tts,instruction_tts,text_to_audio,tts_interleave}
Named template preset for generation.
--ode-method ODE_METHOD
ODE solver method (default: artifact setting, otherwise euler)
--num-steps NUM_STEPS
Sampling steps (default: artifact setting, otherwise 10)
--guidance-scale GUIDANCE_SCALE
Classifier-free guidance scale (default: artifact setting, otherwise 1.2)
--speaker-scale SPEAKER_SCALE
Scale applied to the reference speaker embedding
--max-generate-length MAX_GENERATE_LENGTH
Maximum total audio patch count (prompt + generated)
--max-sequence-length MAX_SEQUENCE_LENGTH
Maximum LLM sequence length used for schedule validation and optimized StaticCache
--normalize-text Whether to normalize text before inference
--profile-inference Collect per-module inference timing statistics
--profile-inference-calls
Log each profiled inference call timingCheckpoints
Seven pretrained checkpoints are released on Hugging Face. They share the same backbone; choose by task and runtime entry point.
dots.tts-base: Pretraining baseline; fine-tuning base.dots.tts-soar: Highest speaker similarity; high-quality voice cloning; fine-tuning.dots.tts-mf: Latency- or concurrency-sensitive TTS.dots.tts-mf-2steps: Latency- or concurrency-sensitive TTS.dots.tts-mf-1step: Latency- or concurrency-sensitive TTS.dots.tts-mf-2steps-stts: LLM interaction and duplex dialogue.dots.tts.edit: Speech editing.
Pass the repo id directly to the entry point shown above; the snapshot is fetched on first use and cached locally. Fixed-step artifacts reject incompatible sampling overrides.
Now, run the basic example script to synthesize speech:
# Random-voice sampling (no reference) — only meaningful with a fine-tuned
# single-speaker checkpoint
dots.tts --model-name-or-path dots-studio/dots.tts-soar --precision float32 --text "Hello, this is a quick speech synthesis test." --output output.wav
The result will be the audio file output.wav
Test Voice Cloning
Download the reference audio
curl -L -O "http://cva4.com/audio/prompt_english_female1.wav"Reference audio sample voice: prompt_english_female1.wav
Now, run the script to clone reference audio:
# X-vector-only voice cloning (reference audio only — timbre from speaker x-vector)
dots.tts --model-name-or-path dots-studio/dots.tts-soar --precision float32 --text "Hello, this is a zero-shot voice cloning demonstration." --prompt-audio prompt_english_female1.wav --output clone.wav

# Continuation voice cloning (reference audio + transcript) — recommended, best SIM
dots.tts --model-name-or-path dots-studio/dots.tts-soar --precision float32 --text "Hello, this is a zero-shot voice cloning demonstration." --prompt-audio prompt_english_female1.wav --prompt-text "In order to win, you must expect to win." --output clone.wav
The output will be an audio file named clone.wav
Python Script
Create a file named dots_test.py:
from dots_tts.runtime import DotsTtsRuntime
import soundfile as sf

runtime = DotsTtsRuntime.from_pretrained(
    "dots-studio/dots.tts-soar",
    precision="float32",
    optimize=False,  # torch.compile acceleration (warmup at load, faster steady-state)
)

result = runtime.generate(
    text="Hello, this is a quick speech synthesis test.",
    prompt_audio_path="prompt_english_female1.wav",
    prompt_text="In order to win, you must expect to win.",
    num_steps=10,
    guidance_scale=1.2,
)

sf.write("clone.wav", result["audio"].float().cpu().squeeze().numpy(), result["sample_rate"])
Run the script to clone voice:
python dots_test.pyThe result will be the audio file clone.wav
Web Demo (Gradio)
Clone dots.tts from GitHub (run after activating the environment)
git clone https://github.com/studio-dots-ai/dots.tts.git
cd dots.tts
Try dots.tts without coding:
python apps/gradio/app.py --model-name-or-path dots-studio/dots.tts-soar --precision float32Open your browser and navigate to http://127.0.0.1:7860. The system will automatically load the model weights during this first run. Please wait for the model to be ready!